
How to Install LED Cove Lighting Crown Moulding
Step-by-step guide to LED cove light installation, from planning the spacing to fitting the lights and finishing the moulding.
In this guide
- What to prepare before installing cove lighting
- 1. Plan the electrical work first
- 2. Mark the height of the cove
- 3. Install a support with the LEDs facing upward
- 4. Attach the strip and make the connections
- 5. Test before fitting the moulding
- 6. Fit, finish and touch up
- Benefits and practical considerations
- Frequently asked questions
To install LED cove lighting, fit a secure support that holds the LED strip horizontally and facing upward, leave room for the light to reach the ceiling, then connect and test the lighting before fitting the crown moulding. Plan the electrical work with a qualified electrical contractor from the start.
This guide explains the Everest Mouldings light-cove arrangement shown in the images and installation video. It covers the recommended ceiling gap, L-track support, strip attachment and moulding finish. The illustrated LC_02 profile provides a traditional shaped edge beneath the indirect light.
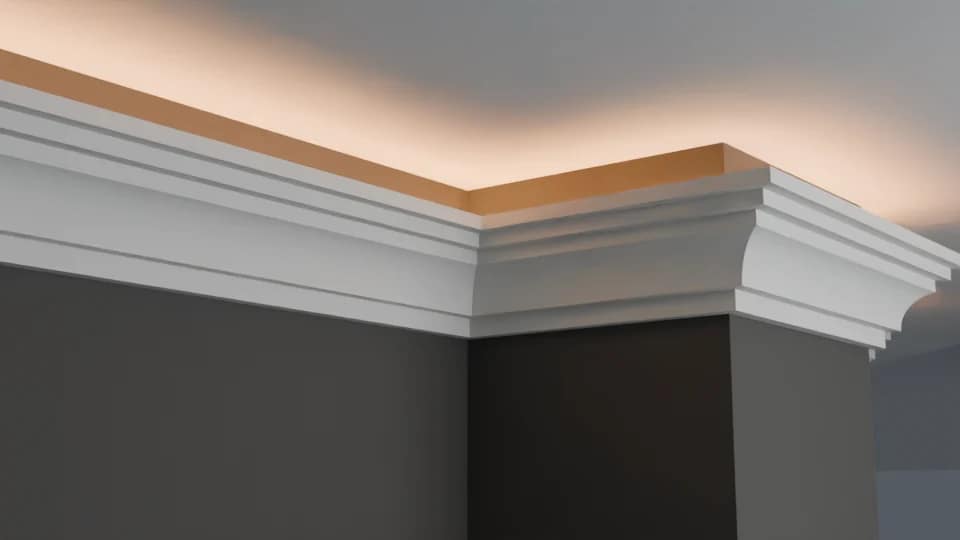
What to prepare before installing cove lighting
- Your selected light-cove moulding and measured wall runs, including inside and outside corners.
- A suitable low-voltage LED system, compatible power supply and any dimmer or controller.
- An L-shaped track or equivalent support, plus fixings suited to the wall.
- The bonding compound or adhesive specified for the moulding, finishing materials, and temporary supports where appropriate.
- A plan with your electrical contractor for connections, controls and future access.
1. Plan the electrical work first
Before starting, consult a qualified electrical contractor so the electrical connections comply with applicable local code. Decide where the power supply and any controls will go, and plan for access after the moulding is installed. We suggest low-voltage LED lighting suitable for the cove.
LEDs still produce heat. Choose lighting with appropriate heat management and follow its clearance and ventilation requirements; low voltage does not mean heat-free. [1]
2. Mark the height of the cove
For this light-cove arrangement, our suggested starting position places the highest part of the moulding approximately 2½ inches below the ceiling. Measure from that highest point, rather than the bottom edge. This leaves room for light to travel upward and reflect across the ceiling.
Check the proposed position with a short lighting test before committing to the full run. The selected profile, LED output and ceiling finish can affect the result. Keep the layout level and consistent through inside and outside corners.
3. Install a support with the LEDs facing upward
An L-shaped track is our suggested support because its horizontal shelf gives the LED strip a place to sit and provides some separation from the wall. Secure the support with fasteners appropriate to the wall and support material. A lightweight track still needs a secure fixing.
Lay the strip horizontally on the shelf with the LEDs facing up toward the ceiling. Attaching it flat against a vertical wall would aim the light outward toward the moulding instead. Other supports can work if they maintain the same upward orientation and space from the wall; there is no single wall-offset measurement specified for every arrangement.

The horizontal LED support, shown in the installation video before the moulding is fitted.
Installation overview
Watch the supplied installation animation for a general view of the support, LED position and moulding sequence. It illustrates the arrangement rather than electrical connection details.
4. Attach the strip and make the connections
Some LED strips come with self-adhesive backing for attachment to a clean, prepared support. Optional cable ties can provide extra support to keep the strip in place and prevent movement, without overtightening or damaging it.
LED strips are available in different lengths, with compatible joining and corner accessories for many systems. Plan the route before fitting the moulding. Use connectors suited to the chosen strip, and check the permitted total length: a strip that can be cut and reconnected is not necessarily extendable. [2]
5. Test before fitting the moulding
Have the electrical contractor complete the electrical connections, then test the entire run. Check the light at corners and joins, look for an even ceiling glow, and confirm that any compatible dimmer, motion sensor or RGB controller works as intended. It is easier to correct placement while the support is accessible.
6. Fit, finish and touch up
Cut and dry-fit the moulding, including the corner joints, before bonding it in place. Use the bonding compound or adhesive specified for the selected profile. For profiles suited to this method, temporary finishing nails can hold the moulding while the bond cures. Once secure, remove the temporary nails and fill the small holes with compatible drywall compound. Finish the joints and surface as appropriate for the product.

An alternate view of the same profile helps show the corner detail.
Benefits and practical considerations
- The concealed light source creates indirect ambient light and highlights the moulding.
- Compatible dimming and colour controls let you adjust the atmosphere.
- Accurate placement and clean corner joints take care and planning.
- Indirect lighting may need to be supplemented by task lighting; power-supply access and future cleaning should also be planned.
See the RGB option — 10 seconds
Light Cove LC_02 with changing RGB lighting and a lateral camera glide. Colours and brightness are illustrative.
Frequently asked questions
How far below the ceiling should the light cove sit?
For the Everest Mouldings arrangement illustrated here, the suggested starting point is approximately 2½ inches from the ceiling to the highest part of the moulding. Confirm the position with the selected profile and a lighting test; it is not a universal clearance for every product.
Should the LEDs attach directly to the wall?
In this arrangement, the strip should lie horizontally on a support with its LEDs facing up. An L-shaped track provides a shelf and some separation from the wall.
When should the lights be tested?
After the electrical connections are completed and before the moulding is fitted. This leaves the strip and support accessible for adjustments.
Planning a light-cove project? Choose your moulding profile first, then coordinate the support, lighting and electrical work around it. Contact Everest Mouldings to discuss the profile that suits your space.